
Introduction
Sugarcane (Saccharum officinarum) is a tall, perennial, tropical grass that serves as the primary source of the world’s sugar and a critical feedstock for biofuel production. Cultivating sugarcane successfully requires a deep understanding of agronomic principles, ranging from initial soil preparation to precise harvesting timelines.
Because sugarcane is a high-input, high-yielding crop, small efficiencies in planting techniques, irrigation management, and harvest timing can significantly alter the final sugar recovery rate (Commercial Cane Sugar or CCS) and overall crop profitability. This comprehensive guide outlines the entire lifecycle of sugarcane plantation and harvesting, providing actionable insights for commercial growers, agricultural students, and agronomic enthusiasts alike.
1. Agro-Climatic Requirements
Before laying a single sett in the ground, understanding the climate and soil dynamics is crucial. Sugarcane is a long-duration crop, typically occupying the field for 10 to 18 months, or even up to 24 months in certain agro-climatic zones.
Climate and Temperature
Sugarcane thrives in tropical and subtropical regions. It demands a warm, humid climate for optimum growth, followed by a cool, dry period for sugar accumulation (ripening).
- Germination Phase: Requires temperatures between 24°C and 30°C. Growth slows dramatically below 20°C and ceases below 15°C.
- Vegetative Growth: High humidity combined with temperatures around 30°C to 35°C accelerates elongation and tillering.
- Ripening Phase: A distinct temperature drop (10°C to 20°C) combined with dry weather is necessary to stop vegetative growth and force the plant to convert stored glucose into sucrose.
Soil Profiling
While sugarcane can grow on a wide variety of soils, it prefers deep, well-drained, fertile loams with a rich supply of organic matter.
- Soil pH: The ideal pH range is 6.5 to 7.5. Acidic soils require liming, while alkaline soils may need gypsum applications.
- Drainage: Sugarcane is highly susceptible to waterlogging. Excess water restricts root respiration, reduces tillering, and invites fungal diseases like red rot.
2. Land Preparation and Field Layout
Thorough land preparation creates a deep, friable seedbed that encourages deep root penetration, helping the crop withstand lodging (falling over) during high winds.
Primary Tillage
Begin by clearing the remains of the previous crop. Use a disc plough or a mouldboard plough for deep tillage (up to 30–45 cm). Subsoiling is highly recommended every 3 to 4 years to break up hardpan layers created by heavy machinery, improving water infiltration and root depth.
Secondary Tillage and Leveling
Pass a disc harrow or rotavator over the field to break down large clods into a fine tilth. Ensure the field is leveled perfectly—ideally using laser levelers—to prevent localized pooling of irrigation water.
Furrow Mapping
Construct ridges and furrows using a ridger. The spacing between furrows depends heavily on the intended harvesting method:
- Manual Harvesting Spacing: 90 cm to 120 cm apart.
- Mechanical Harvesting Spacing: 140 cm to 150 cm apart (widened to accommodate the wheel tracks of sugarcane harvesters without crushing the stool bases).
3. Selection of Seed Material and Treatment
Sugarcane is propagated vegetatively through stem cuttings known as setts or seed pieces. The quality of the seed material dictates the uniformity and vigor of the initial crop stand.
Selecting Quality Seed Cane
- Use nursery-grown cane that is 7 to 10 months old. Younger cane has higher moisture, higher reducing sugars, and active buds that germinate quickly.
- Avoid using the bottom portion of older canes; their buds are often dormant or damaged.
- Select setts with 2 or 3 healthy buds (eyes). Three-budded setts provide insurance against localized rot or physical damage to a single bud.
Seed Treatments
To protect the setts against soil-borne pests and fungal pathogens, execute the following treatment routine:
- Fungicide Soak: Dip setts in a solution of carbendazim (0.1%) or tebuconazole for 10–15 minutes to prevent red rot and smut.
- Insecticide Treatment: Add chlorpyrifos or imidacloprid to the mix if termites or root borers are common in the region.
- Hot Water Treatment (Optional but highly recommended): Circulate seed canes through hot water at 50°C for 2 hours or moist hot air at 54°C to eliminate systemic infections like grassy shoot disease and ratoon stunting disease.
4. Plantation Methods
Various planting systems exist globally, adapted to local water availability, labor constraints, and mechanization levels.
A. Ridge and Furrow System
The most widespread method. Setts are laid horizontally along the bottom of the furrows, either end-to-end or slightly overlapping (by 5–10 cm) if the bud quality is questionable. They are then covered with a 3–5 cm layer of soil and irrigated immediately.
B. Flat Planting
Common in regions with high water tables or sufficient rainfall. Shallow furrows (8–10 cm deep) are opened, setts are placed horizontally, covered with soil, and leveled flat.
C. Trench or Pit Method
Primarily used for high-yield, premium organic farming or in areas prone to lodging. Trenches are dug up to 30 cm deep. Setts are planted in these deep trenches. As the cane grows, soil is progressively filled back in, providing substantial root anchoring.
D. Sustainable Sugarcane Initiative (SSI) / Spaced Transplanting
This modern method utilizes single-bud chips raised in plastic pro-trays inside a nursery using coco-peat. After 25–30 days, the healthy, sprouted seedlings are transplanted into the main field at a wide spacing (e.g., 150 \text{ cm} \times 60 \text{ cm}).
- Advantages: Reduces seed requirement by up to 80%, allows for easy intercropping, and promotes massive tillering.
5. Crop Nutrition and Water Management
Sugarcane is a heavy feeder that requires sustained nutrition and moisture throughout its extended vegetative cycle.
Fertilizer Management
Nutrient recommendations vary based on soil testing, but a general macroeconomic ratio for high-yielding sugarcane is roughly:{N:P:K Ratio} = 250-300 { kg} : 80-100 { kg} : 120-150 { kg per hectare}
- Nitrogen (N): Applied in split doses. One-third at planting, one-third during early tillering (45–60 days), and the final third during the grand growth phase (90–120 days). Avoid applying nitrogen late in the season, as it promotes late vegetative tillers (water suckers) and reduces sucrose accumulation.
- Phosphorus (P): Applied entirely as a basal dose during planting to support robust early root architecture.
- Potassium (K): Applied in two splits (at planting and during the grand growth stage) to enhance sugar synthesis, translocation, and drought resistance.
Water Management and Irrigation Scheduling
Sugarcane requires approximately 1500 to 2500 mm of water throughout its cycle. Water needs peak during the grand growth phase.
| Crop Growth Phase | Timeline (Days) | Irrigation Strategy |
|---|---|---|
| Germination Phase | Day 0 to 35 | Keep soil moist but not waterlogged; light irrigations every 7–10 days. |
| Tillering Phase | Day 36 to 100 | Moderate irrigation intervals; drying out slightly encourages deeper rooting. |
| Grand Growth Phase | Day 101 to 270 | Peak demand; maintain high moisture levels; irrigate every 5–7 days. |
| Maturity / Ripening | Day 271 to Harvest | Critical: Withhold water 3 to 4 weeks prior to harvest to concentrate sucrose. |
Note: Drip irrigation is highly effective in sugarcane, saving up to 40-50% water while increasing yields by delivering nutrients directly to the root zone via fertigation.
6. Intercultural Operations and Weed Management
Because sugarcane germinates slowly (taking 15–30 days to emerge fully) and rows are spaced widely, weeds quickly colonize the open spaces, competing for sunlight, water, and nutrients.
Weed Control Matrix
- Pre-Emergence: Apply Atrazine or Metribuzin within 3 days of planting to suppress broadleaf weeds and annual grasses.
- Post-Emergence: Apply 2,4-D or Halosulfuron-methyl around 30-45 days to eliminate broadleaf weeds and sedges (Cyperus rotundus).
- Mechanical / Manual: Conduct intercultural operations using a mini-tractor-mounted rotavator or manual hoeing at 30, 60, and 90 days.
Earthing-Up (Hilling)
This is the process of moving soil from the ridges into the furrows around the base of the growing cane stalks.
- Partial Earthing-Up: Done at 45–60 days to suppress late-emerging tillers.
- Full Earthing-Up: Done at 90–120 days during the start of the grand growth stage. This converts original furrows into ridges, creating new irrigation channels, providing physical stability to prevent lodging, and burying late weeds.
Detrashing and Propping
- Detrashing: Removing dry, senescent lower leaves from the stalk around the 5th or 6th month. This improves aeration within the crop canopy, reduces the incidence of scales and mealybugs, and simplifies harvesting.
- Propping: Tying stalks from adjacent rows together in a “tent” formation using the lower leaves. This prevents the heavy cane canopy from lodging during storms or heavy monsoon rains.
7. Integrated Pest and Disease Management
Sugarcane is highly susceptible to a spectrum of insect pests and systemic diseases that can devastate both tonnage and sugar yield.
Common Pests
- Early Shoot Borer (Chilo infuscatellus): Attacks young shoots, creating a distinct “dead heart” symptom.
- Management: Soil application of chlorantraniliprole at planting or early earthing-up.
- Top Borer and Internode Borer: Bore into the upper nodes and stalks, stunting growth.
- Management: Release of parasitoids like Trichogramma chilonis at fortnightly intervals.
- Whiteflies and Mealybugs: Suck sap from leaves, excreting honeydew which leads to sooty mold.
- Management: Avoid excess nitrogen usage and maintain proper detrashing practices.
Major Diseases
- Red Rot (Colletotrichum falcatum): Known as the “cancer of sugarcane.” Stalks split open to reveal red internal tissues with white transverse patches, giving off an alcoholic odor.
- Management: Use resistant varieties, clean seed pieces, and practice strict crop rotation. Infected clumps must be uprooted and burned immediately.
- Sugarcane Smut (Sporisorium scitamineum): Characterized by the production of a long, black, whip-like structure from the apex of the affected stalk.
- Management: Rogue out the affected clumps carefully using a polythene bag to avoid spreading the black fungal spores.
8. Maturity Assessment: When to Harvest?
Harvesting sugarcane too early results in low sugar recovery due to high levels of glucose and fructose. Conversely, harvesting too late triggers over-ripening, where sucrose converts back into glucose or degrades into alcohol, lowering cane weight and quality.
Maturity Indicators
| Metric / Indicator | Description / Value |
|---|---|
| Visual Signs | Leaves turn pale yellow; the cane stalk emits a metallic sound when tapped with a fingernail or knife. |
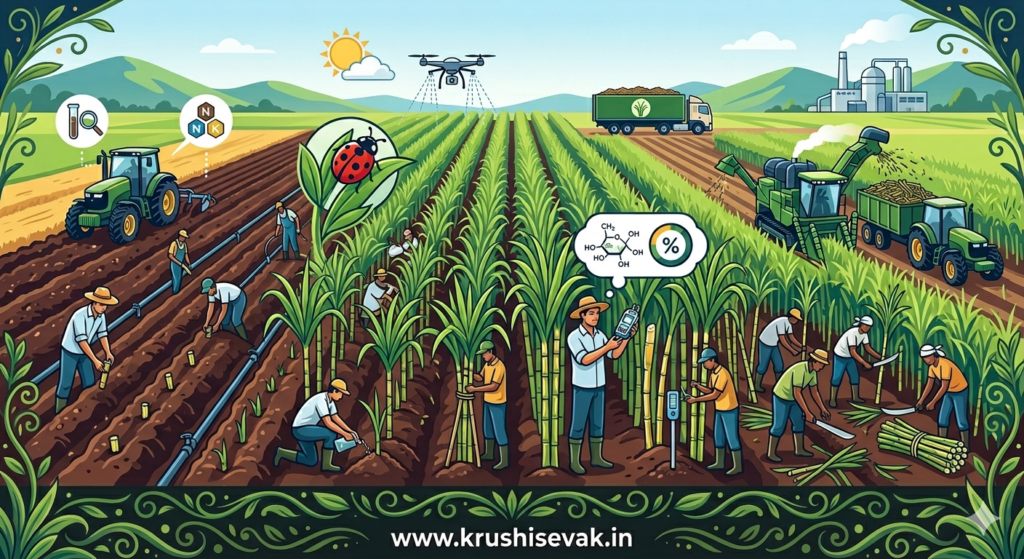
| Brix Hydrometer Reading | Handheld refractometer juice readings from the top and bottom sections should show a ratio close to 1.0, with an overall Brix reading between 18% and 22%. |
| Sucrose Percentage | Laboratory testing indicating juice sucrose content is above 16-18%. |
| Age of the Crop | Early-maturing varieties: 10–12 months. Late-maturing varieties: 12–14+ months. |
9. Harvesting Methods
Once maturity is confirmed, harvesting should proceed rapidly. The overarching goal is to cut the cane as close to the ground as possible, as the lowest internodes contain the highest concentration of sucrose.
A. Manual Harvesting
Predominant in regions with abundant labor, small-holding farms, or hilly topography.
- Process: Handworkers use specialized curved knives or machetes to slice the cane stalk right at ground level. The green top (containing minimal sugar and high moisture) is chopped off, and side leaves are stripped away.
- Pros: Low capital investment; ensures high-quality selection; minimizes damage to the underground ratoon stool; can negotiate uneven terrain.
- Cons: Labor-intensive; slow; hard to manage at large scales; dependent on seasonal labor availability.
B. Mechanical Harvesting
Utilized extensively in large, flat industrial plantations (e.g., Brazil, Australia, parts of the US).
- Process: Mechanical combine harvesters move down the 1.5-meter rows, cutting the base of the cane, chopping the stalks into small segments called billets (approx. 20–30 cm long), blowing away the leaf trash via extractor fans, and conveying the clean billets into a companion tractor wagon.
- Pros: Extremely fast (can harvest hundreds of tons per day); independent of manual labor markets; lowers long-term per-ton harvesting costs.
- Cons: High initial capital investment; requires wide, uniform row spacing; prone to higher trash content in the mill supply; can cause soil compaction and damage underground buds if the base cutters are misaligned.
10. Post-Harvest Management and Logistics
The period between cutting the cane and crushing it at the mill is highly time-sensitive.
Stale Cane Dynamics (Inversion)
Once a sugarcane stalk is cut, it stops manufacturing sugar, but cellular respiration continues. Enzymes called invertases quickly begin breaking down the complex sucrose molecules into simpler reducing sugars (glucose and fructose).
- This post-harvest deterioration accelerates dramatically after 24 hours.
- Billets from mechanical harvesters deteriorate much faster than whole-stalk manually cut canes because they have more exposed cut surfaces open to bacterial entry (Leuconostoc mesenteroides).
Best Practices for Transport
- Aim for a “Cut-to-Crush” interval of less than 24 hours (ideally under 16 hours for billets).
- Keep harvested cane piles shaded or covered with discarded leaf trash if transport delays occur.
- Avoid burning fields prior to harvest unless absolutely necessary for mechanical efficiency, as burnt cane degrades rapidly if it rains post-burn.
11. Ratoon Crop Management
One of the distinct economic advantages of sugarcane is its capacity to produce ratoon crops. After harvesting the plant cane (the first crop grown from setts), the underground stubble remains alive and sends up new shoots for subsequent harvests.
Ratoon Initialization Protocol
- Stubble Shaving: Cut any protruding stalks flush with the ground using a sharp blade. This ensures the next generation of shoots emerges from deeper, underground buds, creating a stronger root base.
- Trash Off-Barring: Move the trash away from the stubble rows into the inter-row spaces to allow sunlight to warm the soil and stimulate rapid bud sprouting.
- Root Pruning and Intercultivation: Run deep tines near the stubble rows to prune old, dying roots, stimulating the plant to develop a fresh, vibrant root system.
- Early Nitrogen Application: Ratoon crops require nitrogen earlier than plant crops because they lack an initial seed-sett reserve. Apply a rich dose of nitrogen within 15–20 days of the previous harvest.
Generally, commercial growers will take 1 plant crop followed by 2 or 3 ratoon crops before plowing the field under entirely to rotate with legumes (like soybeans or green gram) to rejuvenate soil health and break pest cycles.
Summary Technical Checklist
To maximize returns on sugarcane investment, ensure your field operations strictly adhere to this baseline technical checklist:
| Operational Parameter | Targets & Standards |
|---|---|
| Minimum Soil Tillage Depth | 30 to 45 cm (Subsoiling highly recommended). |
| Seed Selection Age | 7 to 10 months old; free from physical or disease blemishes. |
| Optimal Row Spacing | 0.9m – 1.2m (Manual) | 1.4m – 1.5m (Mechanical). |
| Critical Water Phase | Grand Growth Phase (Maintain field capacity; avoid saturation). |
| Maturity Check Threshold | Brix value of 18–22% uniformly across top and bottom sections. |
| Cut-to-Crush Window | Strict maximum of 24 hours to prevent heavy sucrose inversion. |